


In the world of Persona 5 Royal (P5R) modding, a recent finding has the potential to unlock new creative possibilities. But before we dive into that, let’s take a quick look at how we got here.
Back in 2017, the release of the Atlus Script Compiler was nothing short of revolutionary. It allowed modders to create a custom Mod Menu for Persona 5 (PS3), showcasing just how powerful Atlus’s in-game scripting engine really was. With the help of the community, similar Mod Menus were later developed for P3FES, P3P, P4, P4G, and even P3R.

For those unfamiliar, a Mod Menu functions similarly to trainers for games like GTA V (or the one I recently released for EarthBound). Press a button, and a menu appears, offering a variety of useful in-game functions. Need a specific Persona? Want to warp to another location? Need some extra cash? Easy. And that’s just scratching the surface.

The magic behind this lies in the game’s pre-defined scripting functions to gather player input via menus—such as dialogue choices, or scheduling hangouts with Confidants. The best method we had for numerical input was listing digits 0 through 9 in a menu. It worked fine, but we knew we could do better.

Enter the ZealPad
Since February 2022, we’ve been experimenting with a fully custom NumPad, originally conceptualized by lyncpk. The goal was to replace the cumbersome number entry system with a more intuitive controller-friendly interface.

The biggest challenge? Actually displaying it on-screen. The game offers limited options for overlapping images via scripting. Some commands, like TEST_TEX (used for showing images during quizzes), could display images, but weren’t suitable for overlays.

Then we stumbled upon ZEAL_TEX— a rarely used command that could load, display, and remove images dynamically. It seemed like the perfect solution. However, we soon discovered a critical bug: ZEAL_TEX couldn’t load a different image in the same bank once another had been loaded. The workaround involved preloading all images in separate banks, and then toggling their visibility, but this quickly led to memory issues… especially on consoles.
On the Nintendo Switch version of P5R, I had to aggressively shrink and compress textures to avoid crashes, resulting in a comically tiny numpad. While functional, it was kinda laggy and defeated the whole purpose of improving the input method. The PS3 version had it even worse. Certain ZEAL_TEX banks outright crashed the game. At that point, the project stalled.
A New Hope: EPL

Despite that setback, we explored alternative ways to display elements through scripts. One promising method involved using GMD models with textures mapped onto flat planes. This approach kept the NumPad functional, but there was no built-in way to render it directly onscreen like ZEAL_TEX.

That’s when another format caught our attention: EPL, typically used for particle effects. Atlus’s GFD engine is incredibly modular, since both models and particle effects can be infinitely chained together as “attachments,” allowing for complex animations like the All-Out Attack screens. There’s also scripting commands for managing particle effects in the field, so we sought to use EPLs to display our NumPad textures instead.

Unfortunately, this is where we hit yet another roadblock: a hardcoded limit of four active effect banks. This restriction made it impossible to display a full NumPad with a background, number selection, and multiple digit slots at once. Another dead end—until inspiration struck more.

EPL 2 Electric Boogaloo
Fast forward to 2025. Thanks to newly leaked developer tools, EPL editing became far more accessible for modders. One key discovery was the MODEL2D node, which displays a model as a 2D image fixed to the screen.
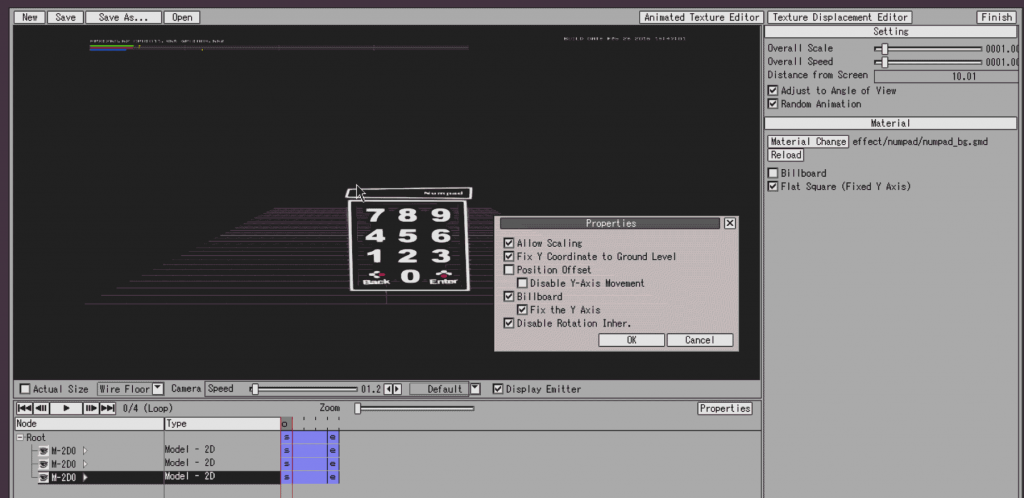
Using the latest documentation, we uncovered additional parameters for locking MODEL2D layers to the screen. On a whim, I decided to inject our old ZEAL_PAD textures into MODEL2D effects, and attach them to GMD models loaded via flowscript. To my surprise, the models stayed locked to the screen—something we previously thought impossible.

I quickly revised our old ZealPad script to use item models that, in reality, were EPLs containing textures as MODEL2D nodes. The results exceeded expectations: the method was faster than anything we had tried before. Plus, since it leveraged real 3D geometry, we could animate the menu components like any other 3D model.
After discussing this with lyncpk, we identified an even more efficient solution. Instead of loading separate models for each digit, we could store them as animations within GAP (GFS animation packs). This way, we could dynamically animate the field model to cycle through digits instead of constantly loading and unloading assets.
To streamline the process, I developed a utility to generate the required UI elements. First, I created a scene in Blender with all necessary elements in a single collection, exporting it as a GMD model using the GFS plugin.

Then, I fine-tuned the materials in GFD Studio before running my program to split the model into individual components—separating each digit, highlight effect, and background.

The final step was recombining them into GAP files and embedding them back into field models. This is what allows us fine control over the digit display via scripting.

Finally, in the below tweet, you can see the results for yourself!
Future of Custom Menus
This discovery, and the tools I’ve built to streamline it, make it possible to create fully custom UI elements in P5R. Even better, this method should be far more memory-efficient when backported to earlier Persona 5 versions… At least as long as asset complexity is kept in check.
The EPLGen program I used to automate most of this process is available on GitHub, although in its current state I will admit it’s not very user friendly. I may try to rectify this in the future.
Also, an updated version of the P5 Mod Menu is still in development. You can read the finished version of the NumPad script on the GitHub repository. There are some bugs to iron out before it’s P5R-ready, but the groundwork has already been laid for backporting to earlier editions once complete.
As always, the Mod Menu remains open-source, allowing anyone to expand on it or integrate parts into their own projects. I’ve been referencing it heavily for my P5R Vinesauce Mod, which relies on custom scripts to deliver its unique experience. Thanks to these recent breakthroughs, implementing certain effects will be significantly easier, and I can’t wait to share the results with the community soon. Stay tuned—there’s much more to come!