Followers of this blog might be aware that I have something of a penchant for digging through old Japanese cheat code repositories in search of fun cheats that English fan bases never got around to digging up, either due to version discrepancies or just lack of awareness. Indeed, in previous posts, I’ve covered how to unlock PS1 Shin Megami Tensei II’s debug menu, as well as how to unlock a dedicated battle debug menu for most versions of Nocturne.
Today’s post obviously focuses on unlocking another such debug menu in Persona 4. While limited debugging features were previously unearthed by others that let you do things like mess with the calendar system and parts of the dungeon crawling, this is a much more proper debug menu that lets you examine much of the nitty gritty of the game, at least insofar as the corresponding menu functions still work. Given the extensiveness of the features on display here, I’ll first cover what you need to do to even trigger the debug menu to begin with before proceeding to translate and break down the features insofar as I could figure them out.
What You Need
A Japanese copy of Persona 4. (Unlike Nocturne, this debug menu has seemingly been disabled in localized editions of the game. It’s also worth noting that this code has only been tested on the original launch release of the game, serial number SLPM-66978. I’m unsure if this works on the PlayStation 2 The Best budget re-release edition and would appreciate anybody who owns a copy testing it and seeing for themselves if that’s the case of not.)
PCSX2. (While this is confirmed to work on actual hardware, for reasons I’ll discuss below, it is highly advised you use the debug menu in emulation instead as a matter of convenience.)
A memory editor such as Cheat Engine. (Optional, but potentially a little more convenient overall if you’re familiar with those sorts of interfaces.)
Inputting the Code
Memory Editors
If you plan on triggering the debug menu using emulation, you have two options at your disposal. First off, if you know how to use Cheat Engine or other such memory editors, you can inject the code directly into the game once you’ve loaded the ISO by manually entering the following: 205F0AD4 00102D10. The first set of numbers is obviously the address you need to manually request, while the second set is the actual number. Make sure the entry is set to hex by right clicking your new cheat under the “Value” column. It’s fussy about this and tends to be set to decimal format by default.
.pnach file/PCSX2
If you don’t know how to use Cheat Engine, you can make a custom cheat file for PCSX2 known as a .pnach that will automatically load the cheat when you boot the game up. Doing so is fairly simple and as such I’m going to basically copy what I wrote for Nocturne since the procedure is the exact same.
.pnach files are the files contained inside PCSX2′s cheat directory that the emulator consults to activate cheats. Making one is simple, even if you don’t understand the actual parlance of what’s contained within them. Just open up a text editor, copy and paste the text for whichever version of the game you want to play using this cheat, and save it to PCSX2′s cheats directory (which should be inside the main folder where you’d normally execute the emulator) using the designated filename I’ve provided (make sure it saves as a .pnach and not as a .txt!). Then, once you’ve opened the emulator, go to the “System” menu option and make sure “Enable Cheats” is checked. After that, you should be set; the emulator will automatically load your cheats into the system once you’ve got the game running. Of course, if you already have .pnach files for Persona 4 in the directory, you can just add this code below whatever else you’ve got and you should be good to go.
Japanese Persona 4 Filename: 43D6E63C.pnach Contents:
gametitle=Persona 4 (Japan)
Debug Menu patch=1,EE,205F0AD4,extended,00102D10
Real PS2 Hardware
If you want to enter the debug code on console, you’ll obviously need a cheat device of some sort in addition to the actual game. You’ll also need to track down the master code so that you can use cheats in the game without the system freaking out. For convenience’s sake, I’ll include both that master code and the actual debug menu code in a raw, unencrypted format below:
F0100208 0000000E 205F0AD4 00102D10
Many cheat devices will require you to convert both of these codes to another format before you can actually use them. Thankfully, there’s a tool out there called Omniconvert that can do the job for you, which you can download here. Just stick these numbers in the input column on the left, then go to the Input menu and choose “Unencrypted” and then “Standard.” After that, use the Output menu to choose whatever cheat hardware you have, press the “Convert” button on the bottom left, and then copy the final results into your cheat device.
Since most of you will likely need to use Swap Magic in order to boot a Japanese copy of Persona 4 on real hardware anyway, I’ll save you the trouble of figuring out the codes you need for that and include them below:
EC878530 1456E79B 1CCA8DFC 144602B5
Getting to the Debug Menu
Once you’ve input the code for the debug menu using any of the means above, the rest should be automatic. After the memory card check and initial load, you should immediately see this screen below rather than the opening movie. (If you use a program like Cheat Engine to do it, time is of the essence. You need to input that code as soon as possible while the game is booting up or else you’ll miss your window of opportunity. Of course, if you’re too slow, you can just freeze the value and restart the game, at which point, you should get to the debug menu.)
At this point, controlling the debug menu is generally pretty simple. Just scroll through the list using the d-pad and then select or cancel using the Circle and X Buttons, respectively. One important thing to note, though: once you’ve activated an option, the rest of the debug menu tends to be rendered useless and inaccessible, even if you back out for whatever reason. This means that to test various options, it’s highly suggested you use savestates so that you can instantly reload back into the debug menu and not have to restart the booting process from scratch. This is why using the debug menu on real hardware isn’t advised, as you’ll have to reset the system and possibly reenter or reactivate your codes just to get back to this screen. Save yourself the hassle; computers have advanced far enough that you don’t need a top of the line PC to run Persona 4 in PCSX2, especially for this level of functionality.
Debug Menu Translation
Many of you reading this probably understandably can’t read Japanese. Fear not, for I’ve translated and briefly documented below more or less what every option in every menu does, at least among the ones that still work properly. Bold items signify the options in the main menu, while italics signify sub-menu options contained within each main option.
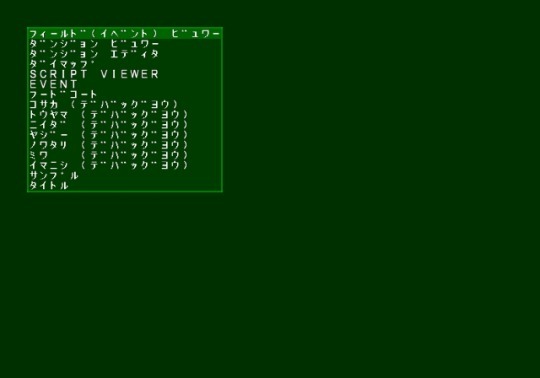
Field (Event) Viewer MAJOR (#) MINOR (#) START POS (#) FBN (#) ENV (#) FIELD HIT (T/F) Display Imaginary NPCs (T/F) Event Major Event Minor Definition Table Dungeon Viewer Level (#) (This number covers both the dungeon and the individual floor) Build ID (#) No Enemy Symbol Placement (T/F) No Enemy Attacks (T/F) (Enemy won’t trigger an encounter even if they collide with player) No Enemy Detection (T/F) (Enemy won’t notice player) No Treasure Chest Placement (T/F) Dungeon Editor MAJOR (#) MINOR (#) Set your numbers and press circle to confirm to enter editor. Controls are as follows: -L1/R1: Rotate block -L2/R2: Change block type -Circle: Place block Dymap (Takes you to town location menu) SCRIPT VIEWER (Doesn’t work?) EVENT (Doesn’t work?) Food Court (Takes you to food court) Kosaka (For Debugging) Map Test (Dungeon map layout generator test?) TYPE A (#) TYPE B (#) TYPE C (#) Level (#) Set your numbers for the above items and then press Circle. Some combinations of numbers can make menu freeze. Field Unit Test (Takes you to school and cycles through two areas) Reload Rain Texture (Doesn’t work?) Fog Test (Displays rain) Noise Test (Displays TV noise filter) Icon Test (Doesn’t seem to work?) Field Background Clamp Instance (Doesn’t work?) Field TEX Strip (Doesn’t work?) Dungeon Parts TEX Strip (Doesn’t work?) RWS Test (Brings up a text prompt, unknown function) Tōyama (For Debugging) Load Initialization Data (Doesn’t seem to work?) pak2 Test (Text prompts appear that can change with button presses; unsure what for) Display Item Data (Press up and down on d-pad to display item names) Camp (Opens the triangle button menu) Cut-in (Displays a bouncing Yukari cut-in) Bust Up (May not work) Bank (#) Character (#) Kune (#) (Unknown function) Expression Load Display Turn Off Movie (Doesn’t work) Clear Data SAVE (Saves a New Game Plus file) Memory Card DEUBUG (Should be debug; haven’t tested, but back up memory card files if you venture into this!) GET MEMCARD INFO DATA WRITE UNFORMAT FORMAT CONVERT Niida (For Debugging) (Doesn’t work) Yajii (For Debugging) (Brings up a location; choose with left and right on d-pad and press O to load, last option appears to not work; pressing square triggers experience point sound and triangle makes name flash?) Nowatari (For Debugging) LINE TEST (Does an animation test of the colored menu lines) SFL TEST (Doesn’t work) CAMP TEST (Opens triangle button menu) PERSONA TEST (Change Persona ID +/-1 with d-pad up/down, +/-16 with d-pad left/right, circle to load; L1/R1 to change ID +/-1 and load immediately; Start changes ordering between Arcana, level, and internal hex ID numbers; Square button changes state between normal, level up, and bonus EXP from Social Link bonuses; triangle changes other miscellaneous options; other options appear when pressing other buttons, will confirm later) MISC (Displays an Izanagi Persona card) Miwa (For Debugging) FONT (Displays a menu where you can test varying font effects; choose a cell with circle to make value go to 0; increase it temporarily again with R1) Name Entry (Opens the name entry menu) System Window (Tests various system message windows; up and down on d-pad to select and circle to choose) Assist Window (Doesn’t work) Save (Creates a special save file with RESERVE set as the location name; loading it is like starting a non-New Game Plus Run seemingly; needs further testing) Load (Opens the save file loading screen; unsure if it actually works) Time Change (Changes time of day) Day Change (Advances in-game calendary) TV World (Triggers transition into TV World; unsure if it does more beyond that) Pesto (Doesn’t work) Imanishi (For Debugging) Sample (Brings up a sample screen with katakana and Latin character sets) BAD Staff Roll (Triggers credits roll for bad ending) TRUE Staff Roll (Triggers credits roll for true ending) Verify (Triggers staff-less credits roll for a few roles) Sample (Doesn’t work) Sample (Same as first sample option in Imanishi) Title (Seemingly doesn’t work)
Whew, that’s a lot to parse through, isn’t it? While I did my best to test the functionality of things in so far as I could, some menus where you’re asked to input a lot of numbers I obviously couldn’t fully test and may not know what all they have to them, so please, by all means, if you come upon things that I haven’t noted here, please feel free to share them with me, especially if they contradict what I have! I want this documentation to be as complete and accurate as possible so that the people who want to dig through this can do so knowing what they’re doing.
Putting Out a Translation Patch for This Menu
While I’ve opted to just do a basic text translation inside a Tumblr test, my own testing leads me to believe that it should be possible to put out a translation patch for this debug menu. The reason why I didn’t go through with it is that text encoding makes doing so a bit of a headache, but for those interested in giving it a shot, here’s what you’ll need to know:
The debug menu code is obviously contained inside the game’s executable, an ELF file titled “SLPM_669.78.” This should be the only file you ever need to touch to get it working.
As with the rest of the game’s text, the debug menu options are encoded in Shift-JIS. The tricky thing, however, is that all of it except for the menu options written in romaji already are half-width size, rather than the standard full-width (e.g.: the word katakana would look like カタカナ rather than カタカナ). From what I’ve seen, not every hex editor necessarily supports this text rendering mode out of the gate, even the ones that otherwise ostensibly do support Japanese text encoding.
You may therefore be forced to track down menu options by searching for the hex values of each character, rather than a conventional text search. This site here should be able to handle it. Chon-chons (the dashes to the upper right of characters that turn characters like カ into ガ) and bubbles (e.g.: ホ into ポ) are also their own separate character, rather than properly integrated into the character being modified, as is normally the case. Finally, each character takes up one byte rather than the standard two, meaning that any English that’s inserted won’t have extra space to work with, at least by default.
To my knowledge, a full English font is loaded into memory in this screen, meaning you should be able to type away as necessary without worrying about any missing characters. You can even choose between uppercase and lowercase letters if you like! Just obviously beware that text space is limited for the reasons stated above.
A partially translated version of these debug menu options does exist in the localized English game’s executable, even though the functionality itself has been wiped out. It’s entirely possible that you might be able to get away with just copying and pasting what’s there for the relevant options, but I would personally suggest doing it from scratch just to be safe. What remains also doesn’t really seem helpful at all in terms of establishing context for the more ambiguous options, but I figure it’s still worth mentioning so that those interested in patching the game have every tool at their disposal.
Though I know Persona 4 does have some file integrity protocols that it runs to confirms in-game files are as they should be, I don’t think hex editing the debug menu should break anything on that front. As such, a basic patch like those used in other PS2 translation efforts should likely do the job fine. If any prospective patchers would like additional translation assistance in the event that more stuff is unearthed or just need more truncated alternatives for text space reasons, please don’t hesitate to get in touch and I’ll see what I can do!
Conclusion
While I don’t recall finding anything new in terms of deleted content, I also obviously didn’t exhaust every last option at my disposal within the debug menu itself because of the sheer scope of some options. As such, I still highly encourage the adventurous among you to take a look inside and share what you can find! If you find something especially interesting or need to contact me about something else related to the debug menu, my IM inbox for this blog should be opened, so don’t be shy! (I can also be contacted at iiotenki on Twitter, if you prefer that way of doing things.) If anything especially juicy comes up, I’ll be sure to update this post and credit the lucky people to find it!
Until then, hopefully this is of use to some of you out there or you at least get some good kicks out of it. Many of the repositories that include these Japanese codes and discussions surrounding them are extremely outdated and could potentially one day be deleted without intervention, so if nothing else, I’m glad I can do my small part to unearth them and share them with foreign fans when possible. For those of you unable to run the debug menu yourself, I’ll leave you with a few fun screenshots of what lies in store, perhaps to tease you into sharing it with friends and stuff.