
In this guide, you’ll learn how to apply and use these modifications, whether you’re…
- Playing on a 3DS console with custom firmware, or
- using Citra 3DS emulator.
You can view more details or download the patches from this post:

Player Name
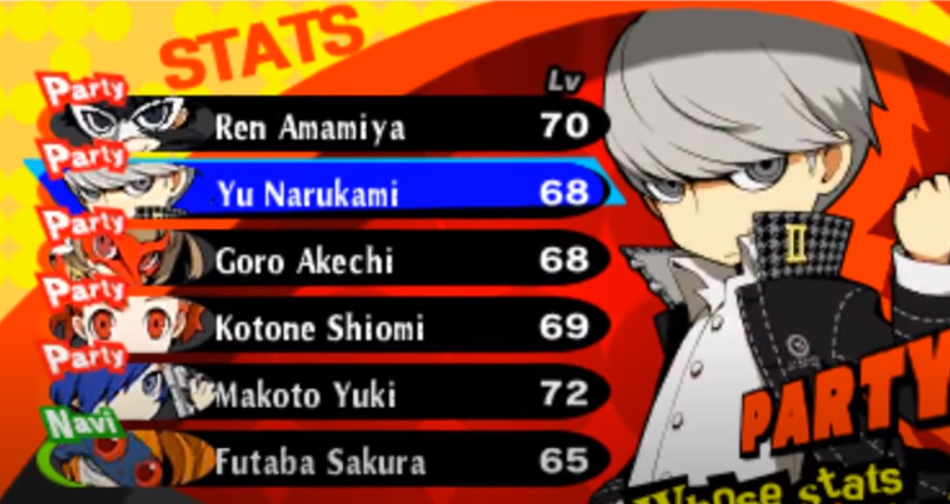
Extended Protagonist Names
This allows you to use your choice of “canon” names for the “leader” characters.
By default, they are:
- P3 MC:
Makoto Yuki(PQ/PQ2) - P4 MC:
Yu Narukami(PQ/PQ2) - P3P FeMC:
Kotone Shiomi(PQ2) - P5 MC:
Ren Amamiya(PQ2)
These automatically override whatever is entered in the in-game character naming screen, so don’t worry about having to start your save over.
If you want to pick different names such as “Minato Arisato,” you can hex edit the code.bin file from the patch download. A free hex editor like HxD will do the trick.

- Ssearch for the name “Makoto” as a Text-string with
CTRL+F. - Type over the existing names in the right-hand “decoded text” column.
- If your name happens to be shorter, overwrite unwanted letters with
00bytes.
Each protagonist has a full name, then a surname, and finally a first name. Each name can be up to 14 letters long, including spaces (therefore the full name is 28 letters long).

Be careful not to accidentally change the size of the file while editing!
Once you are done, save the file.
Mod.cpk Support
A mod.cpk is an archive that contains modified files, which are loaded with priority over the originals.
Even if you don’t intend on using this feature, the game will crash if a mod.cpk is not present.
- PQ (USA):
0004000000123400 - PQ2 (USA):
00040000001D7100
Custom Firmware (Luma3DS)
To play using these patches on console, copy the contents of your downloaded patches folder to your SD card:
sd:/luma/titles/<title_id>/exheader.binsd:/luma/titles/<title_id>/code.binsd:/luma/titles/<title_id>/romfs/mod.cpk
Make sure mod.cpk goes in the romfs folder!
Citra 3DS Emulator (PC)
To use these patches on PC, find the <citra_vfs> (virtual filesystem) folder by right clicking the game in Citra and choosing “Open Mods Location”.
Then, copy the contents of your downloaded patches folder to your SD card:
<citra_vfs>/load/mods/<title_id>/exefs/code.bin<citra_vfs>/load/mods/<title_id>/exheader.bin<citra_vfs>/load/mods/<title_id>/romfs/mod.cpk
Make sure mod.cpk goes in the romfs folder!
Also, in this case, make sure the code.bin goes in an exefs folder inside the

To check if it worked, at least for Persona Q2, a mod I like to test with is Talk Animation Fix. This was made by DeathChaos and myself, patching an oversight in the game that caused some characters mouths to not animate during dialog.
Rebuilding the CCI/CIA
While unnecessary due to Luma 3DS and Citra’s external file loading, you may choose to add the patch to a ROM. Some users report this being more reliable than Citra’s built-in mod support.
DOWNLOAD: https://github.com/evandixon/DotNet3dsToolkit/releases
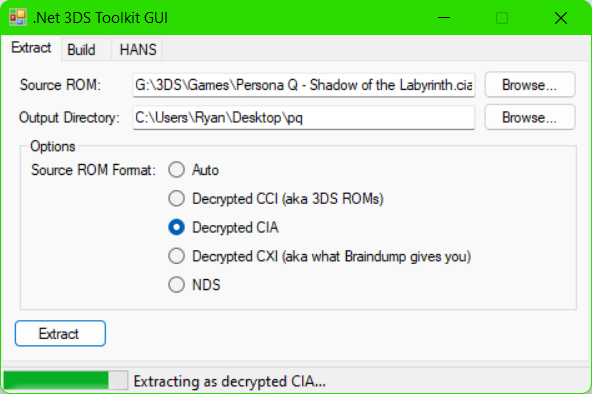
DotNet3DSToolkit allows you to extract the contents of a .3ds, .cia, or .cci file. If you get errors, double check that you picked the right format.
Like before, place the exheader.bin, code.bin, and mod.cpk files in your newly generated folder. Replace existing files. The exheader.bin file goes in the ExeFS folder.

Change to the Build tab and choose the extracted folder, a name and destination for your new ROM, and the desired output type.
Your new ROM will be built and you can try it out on your platform of choice!